Charcuterie Cups
Skip the boring veggie tray this year — these charcuterie cups are the party appetizer upgrade nobody knew they needed. They’re individual, grab-and-go, and honestly, they look way fancier than the effort required.
I first made these for my cousin’s graduation party, and they were gone in under ten minutes. Now they’re my go-to whenever I need easy grab and go appetizers that actually impress people.
Table of Contents
What Makes These Charcuterie Cups So Great
This is the kind of recipe that makes you want to cook everything in sight. Lucky for you, the collection is full of exactly that. Go explore and find your new go-to dish.
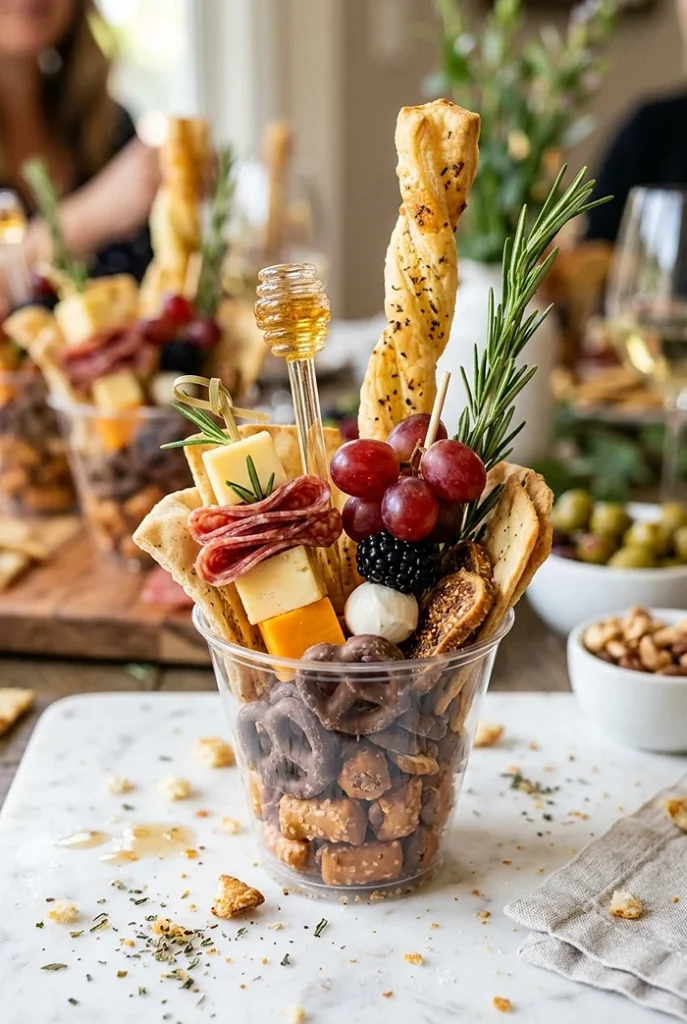
These little party cups pack a serious punch. You get salty salami, creamy cheese cubes, sweet fruit, crunchy pretzels, and a drizzle of honey all in one tidy package. No double-dipping, no shared boards, no forks required.
They’re perfect as graduation appetizers because guests can snack while mingling — no plates, no fuss. Plus, you can prep almost everything the day before, which is a total lifesaver when you’re juggling a big event.
If you love hands-off entertaining food, you’ll also want to check out these easy grilled chicken wraps for another crowd-pleasing option.
Ingredients
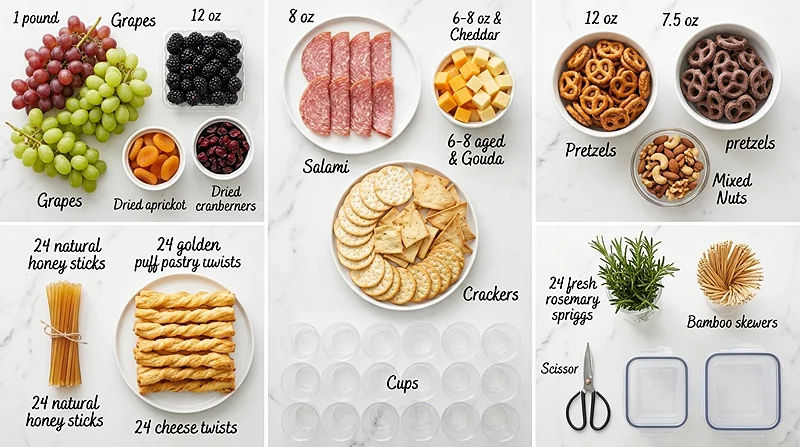
Here’s everything you need to build 24 gorgeous charcuterie cups. Group your shopping by category so assembly goes smoothly.
| Category | Ingredient | Amount |
|---|---|---|
| Fresh Fruit | Seedless grapes (red or green) | 1 pound |
| Fresh Fruit | Blackberries (or other berries) | 12 ounces |
| Meat | Salami (2–3 pieces per cup) | 8 ounces |
| Cheese | Cheese cubes (Gouda or Cheddar) | 6–8 ounces |
| Fillers | Peanut butter-filled pretzels | 12 ounces |
| Sweet Treats | Chocolate-covered pretzels | 7.5 ounces |
| Sweet Treats | Honey sticks | 24 pieces |
| Crackers | Long skinny crackers (puff pastry cheese twists) | 24 pieces |
| Crackers | Regular crackers or pita chips | 24–48 pieces |
| Garnish | Fresh rosemary sprigs | 24 sprigs |
Step-by-Step Instructions
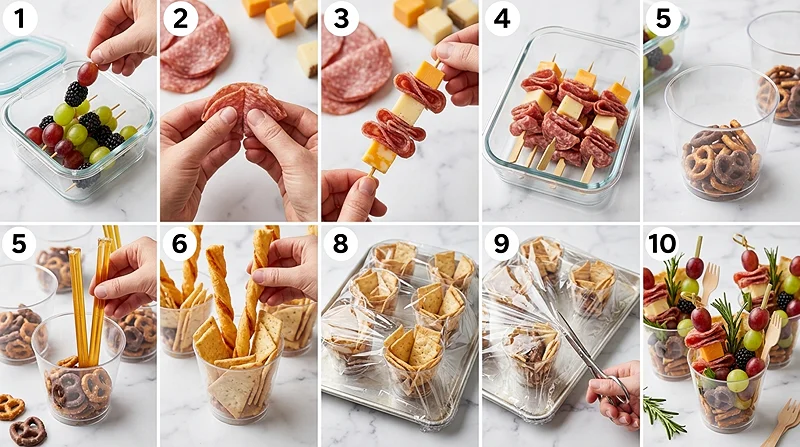
Don’t let the list of ingredients intimidate you. Assembly is genuinely fun — think of it like building tiny little edible gift boxes. Here’s how to do it.
Step 1: Prep the Fruit Skewers
Thread grapes and blackberries onto small skewers, alternating for color. Don’t overthink it — just make them look pretty and full.
Pop the finished skewers into an airtight container and refrigerate. You can do this up to 24 hours ahead of time, which makes party-day prep so much easier.
Tip: Mix red and green grapes for a more colorful, festive look — especially nice for graduation appetizers with school colors!
Step 2: Make the Meat and Cheese Skewers
Fold each slice of salami into quarters — it creates that adorable little fan shape you see on fancy charcuterie boards. Thread 2–3 folded salami pieces onto a skewer, adding cheese cubes in between.
Store these in an airtight container and refrigerate until you’re ready to assemble. Again, totally fine to do this the night before.
Pro tip: Gouda is my personal favorite here. It’s creamy, mild, and pairs beautifully with the salty salami. Cheddar works great too if you want a sharper bite.
Step 3: Build the Base of Your Cups
Grab your cups and start filling the bottoms with your fillers — peanut butter pretzels, chocolate-covered pretzels, nuts, or dried fruit. This step is more important than it looks.
The fillers add height and structure so the taller items have something to lean against. Think of it as building the foundation of a tiny edible tower.
Step 4: Add the Tall Items
Now for the fun part. Stick your honey sticks and long cheese twists upright into the filler base. They should stand tall and proud — like little flagpoles of deliciousness.
Tuck in your regular crackers or pita chips around the tall items. Layer in extra pretzels, more chocolate treats, or anything else you’re including.
Note: The goal is a full, abundant-looking cup. Don’t be shy — stuff them generously!
Step 5: Wrap and Refrigerate (If Making Ahead)
If you’re not serving immediately — or you need to transport the cups — place them all on a baking sheet. Wrap plastic wrap snugly around the bottom of the baking sheet and up over the tops of the cups.
This holds everything in place during transport and keeps the cups fresh in the fridge. These are genuinely some of the best easy grab and go appetizers you can make ahead for a crowd.
Step 6: Finish and Serve
Right before serving, use scissors to carefully cut away the plastic wrap. Now add your meat and cheese skewers and fruit skewers — these go in last so they stay fresh and pretty.
Tuck in a sprig of fresh rosemary for garnish. It adds a gorgeous herby aroma and makes each cup look like it came from a professional caterer. Your guests will be so impressed.
Expert Tips, Variations, and Troubleshooting
Tips for Perfect Charcuterie Cups
Use cups that are at least 3–4 inches tall so you have room to layer. Clear plastic cups or small mason jars both look beautiful and let guests see all the goodies inside.
Always add the skewers last. If you insert them too early, the fruit can weep and make the crackers soggy. Nobody wants a soggy cracker situation at their party.
Fun Variations to Try
These charcuterie cups are incredibly flexible. Swap in pepperoni or prosciutto instead of salami for a different flavor profile. Use brie or smoked gouda if you want something fancier.
Going for a sweeter theme? Skip the salami altogether and load up with dried apricots, candied nuts, chocolate pieces, and fresh berries. They work beautifully as dessert-style party cups.
For a seasonal spin, use dried cranberries and white cheddar in fall, or tropical fruit and macadamia nuts for a summer party vibe. These also pair wonderfully alongside a fresh homemade bean dip as part of a bigger snack spread.
Troubleshooting Common Issues
Cups tipping over? Make sure you pack the base fillers tightly enough to anchor everything. A heavy layer of pretzels or nuts at the bottom works wonders for stability.
Fruit going mushy? Only add fresh fruit skewers right before serving. Grapes and blackberries release moisture quickly, especially at room temperature.
Crackers going stale? Keep assembled cups refrigerated and covered until the last possible moment. The plastic wrap method described above is your best friend here.
Storage Instructions
Here’s a quick reference for storing your charcuterie cups at every stage of the process.
| Stage | Storage Method | How Long |
|---|---|---|
| Fruit skewers (prepped) | Airtight container, refrigerated | Up to 24 hours |
| Meat and cheese skewers (prepped) | Airtight container, refrigerated | Up to 24 hours |
| Assembled cups (without skewers) | Plastic-wrapped, on baking sheet, refrigerated | Up to 24 hours |
| Fully assembled cups | Refrigerated, loosely covered | Best within 2 hours of serving |
| Leftover components | Separate airtight containers, refrigerated | 2–3 days |
Reheating and No-Waste Ideas
These cups are meant to be enjoyed cold or at room temperature — no reheating needed. But if you have leftover ingredients, don’t let them go to waste!
Extra grapes and berries are amazing blended into homemade lemon raspberry popsicles — a perfect treat if your party runs into a warm afternoon.
Leftover cheese and crackers make an easy next-day lunch. Toss leftover salami into scrambled eggs or a quick pasta for a no-fuss weeknight meal.
Got extra rosemary? Stick the sprigs in a glass of water on your windowsill — fresh herbs last longer that way and you’ll have them ready for your next recipe adventure.
Nutritional Information
Nutritional values are approximate per cup and will vary based on exact brands and quantities used.
| Nutrient | Per Cup (Approximate) |
|---|---|
| Calories | 220–270 kcal |
| Protein | 7–9g |
| Total Fat | 12–15g |
| Saturated Fat | 4–6g |
| Carbohydrates | 20–25g |
| Fiber | 1–2g |
| Sugar | 8–10g |
| Sodium | 350–450mg |
Frequently Asked Questions
Can I make charcuterie cups the night before?
Yes! You can prep the fruit skewers and meat and cheese skewers up to 24 hours in advance. You can also assemble the base of the cups the night before. Just add the skewers and rosemary garnish right before serving so everything stays fresh and pretty.
What cups work best for charcuterie cups?
Clear plastic cups (about 9–12 oz) are the most popular choice because guests can see all the goodies inside. Small mason jars are a gorgeous reusable option for fancier events. Just make sure whatever you use is at least 3–4 inches tall so there’s room to layer everything nicely.
How many charcuterie cups do I need per person?
Plan on one cup per person if these are part of a larger spread of graduation appetizers or party food. If charcuterie cups are the main appetizer, budget two per person. Better to have a few extras than run out — they go fast!
Can I make these nut-free?
Absolutely. Just swap the peanut butter-filled pretzels for regular pretzels, plain crackers, or dried fruit. Everything else in the recipe is naturally nut-free, so it’s an easy swap that won’t affect the look or taste of your cups.
What other fillers can I use instead of pretzels?
So many options! Dried apricots, raisins, cocktail nuts, sunflower seeds, mini breadsticks, or even popcorn all work great as base fillers. The goal is just something sturdy enough to hold your taller items upright. Get creative with what you love or what’s on sale.
Time to Make Your Charcuterie Cups!
These charcuterie cups are seriously one of those recipes that feels way more impressive than the effort involved. Individual, portable, customizable, and absolutely gorgeous on any table.
Whether you’re hosting a graduation party, a baby shower, or just a casual get-together, these easy grab and go appetizers will be the first thing to disappear. I promise you’ll be making them on repeat all season long.
Want even more crowd-pleasing recipes? Try this surprisingly addictive classic zucchini bread for a sweet addition to your party spread — or go all-in with this rich chocolate zucchini bread that tastes like dessert but feels a little virtuous.
If you try this recipe, I’d love to hear how it goes! Leave a comment below with your favorite fillers or flavor combinations. And if your charcuterie cups turn out as gorgeous as I know they will, please share them on Pinterest — it truly makes my day to see your creations!
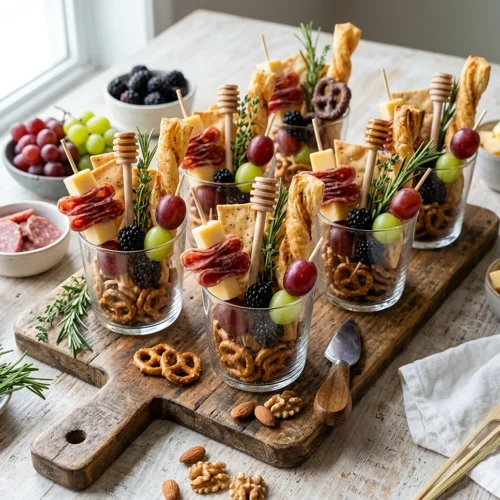
Charcuterie Cups
Equipment
- Small skewers
- Airtight Containers
- Baking sheet
- Plastic wrap
- Scissors
- Cups (9–12 oz clear plastic or small mason jars)
Ingredients
Fresh Fruit
- 1 pound Seedless grapes red or green, or dried fruit
- 12 ounces Blackberries or other berries or dried fruit
Meat
- 8 ounces Salami 2–3 pieces per cup
Cheese
- 6-8 ounces Cheese cubes such as Gouda or Cheddar
Fillers
- 12 ounces Peanut butter-filled pretzels or other filler items like nuts or dried fruit
Sweet Treats
- 7.5 ounces Chocolate-covered pretzels or other sweet treat
- 24 pieces Honey sticks or other sweet treat
Crackers
- 24 pieces Long skinny crackers such as puff pastry cheese twists
- 24-48 pieces Regular crackers or pita chips
Garnish
- 24 sprigs Fresh rosemary for garnish
Instructions
- Thread grapes and blackberries onto small skewers, alternating for color. Place in an airtight container and refrigerate for up to 24 hours in advance until ready to serve.
- Fold each salami slice into quarters to create a fan shape. Thread 2–3 folded salami pieces onto separate skewers along with cheese cubes. Place in an airtight container and refrigerate for up to 24 hours in advance until ready to serve.
- Fill the bottoms of the cups with peanut butter-filled pretzels, chocolate-covered pretzels, nuts, or dried fruit. Pack them in firmly — this adds height and structure so taller items have something to lean against.
- Insert honey sticks and long skinny crackers or cheese twists upright into the filler base so they stand tall. Tuck in regular crackers or pita chips around the tall items, and add any additional pretzels or sweet treats to fill out the cup.
- If not serving immediately or if you need to transport the cups, place them on a baking sheet. Wrap plastic wrap snugly around the bottom of the baking sheet and up over the tops of the cups to hold everything in place. Store in the refrigerator.
- Before serving, use scissors to carefully cut away the plastic wrap. Add the meat and cheese skewers and fruit skewers into each cup. Insert a fresh rosemary sprig into each cup for garnish and serve immediately.