Cheeseburger Sliders for Dinner
Craving a fun, crowd-pleasing meal that comes together in under 30 minutes? These cheeseburger sliders for dinner are your new weeknight hero — cheesy, juicy, and baked to golden perfection.
I started making these on busy Friday nights when everyone wanted burgers but nobody wanted to stand over a hot grill. One bite and my family declared them better than any drive-through. That’s all the motivation I needed.
Table of Contents
Why You’ll Love These Cheeseburger Sliders
This recipe is just the beginning. Over in the collection, you’ll find even more dishes that are just as easy and packed with flavor. Go take a peek — your next favorite is waiting.
These aren’t just mini burgers — they’re a full-on dinner experience packed into a soft, buttery roll. The secret is layering sliced and shredded cheddar so every bite is loaded with melty, gooey goodness.
They’re also one of the best easy dinner ideas you’ll find because everything bakes together on one sheet pan. Less cleanup, more time with your people. Win-win.
Whether you’re feeding a hungry family on a Tuesday or bringing the goods to a party, these sliders deliver every single time. They also make fantastic party food dinner spreads alongside other fun finger foods.
Quick Overview
This recipe makes 24 sliders, so it’s perfect for a crowd or for meal prepping lunches. You get seasoned, juicy ground beef mixed with a surprise ingredient — mayo — that keeps everything moist even after baking.
Double cheddar cheese, sesame seed-topped butter-brushed buns, and a single oven bake make these completely stress-free. These cheeseburger sliders are bold in flavor but simple in execution.
Ingredients
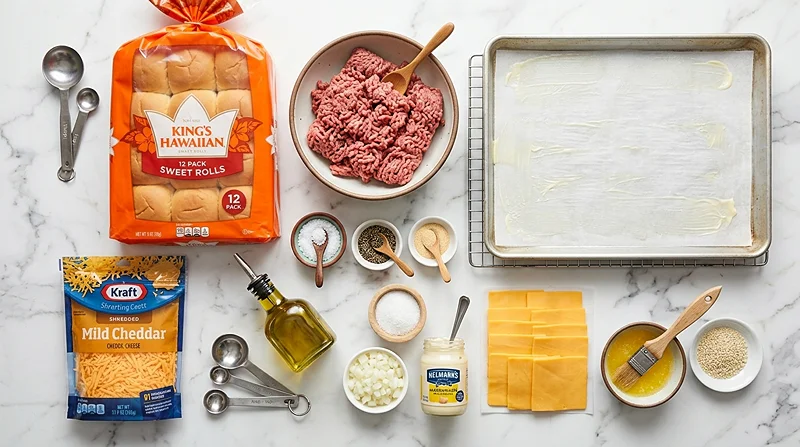
| Category | Ingredient | Amount |
|---|---|---|
| Beef & Seasoning | Lean ground beef (90/10 or 93/7) | 2 lb |
| Beef & Seasoning | Olive oil | 1/2 Tbsp |
| Beef & Seasoning | Salt | 1 tsp |
| Beef & Seasoning | Black pepper | 1 tsp |
| Beef & Seasoning | Garlic powder | 1 tsp |
| Beef & Seasoning | Yellow onion, finely diced | 1/2 large |
| Beef & Seasoning | Mayonnaise | 1/4 cup |
| Cheese | Medium cheddar, sliced | 8 slices |
| Cheese | Medium cheddar, shredded | 6 oz |
| Buns & Topping | Dinner rolls (2 packs of 12) | 24 |
| Buns & Topping | Unsalted butter, melted | 2 Tbsp + more for pan |
| Buns & Topping | Sesame seeds | 1 Tbsp |
Step-by-Step Instructions
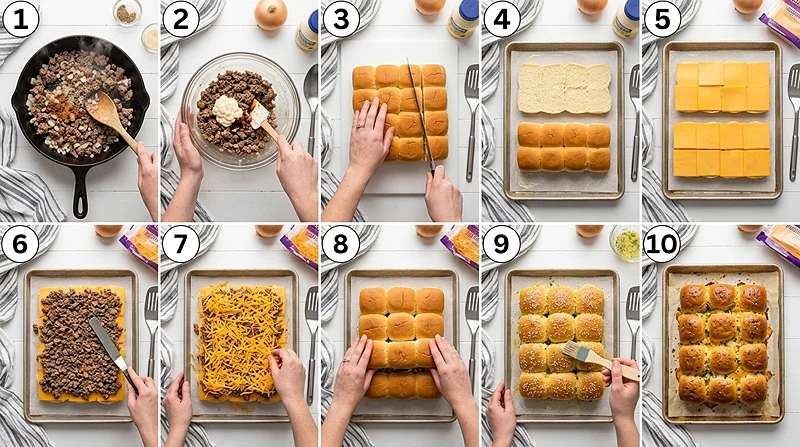
Step 1: Prep Your Pan and Oven
Preheat your oven to 350 degrees F. Butter the bottom of a rimmed baking sheet generously — this keeps the buns from sticking and gives the bottoms that subtle golden crisp you’ll love.
Don’t skip buttering the pan! It makes a real difference in the final texture of the buns.
Step 2: Cook the Beef and Onion
Heat a large skillet over medium-high heat with 1/2 Tbsp of olive oil. Add your finely diced onion first and let it soften for about a minute — you’ll start to smell it getting sweet and fragrant.
Add the 2 lbs of ground beef and break it up with a spatula. Season with 1 tsp salt, 1 tsp black pepper, and 1 tsp garlic powder. Cook over medium-high heat, breaking it up as you go, just until it’s cooked through. Don’t overcook — you want it juicy, not dry.
Step 3: The Mayo Secret
Tilt your skillet and spoon off any excess fat — lean beef won’t release a ton, but discard whatever pools up. Then stir in 1/4 cup of mayo directly into the warm beef mixture.
“The mayo keeps the filling moist and creamy inside the bun — trust the process, it’s a game changer.”
This step is what separates good sliders from great sliders. The mayo binds everything together and adds a subtle richness you can’t quite put your finger on but definitely notice.
Step 4: Build the Sliders
Cut all your dinner rolls in half and lay the bottom halves on your prepared baking sheet. Line them with the sliced cheddar cheese, making sure to cover the bread edge to edge. This creates a moisture barrier so the buns don’t get soggy.
Spread the ground beef mixture evenly over the sliced cheese. Use the back of your spatula to press it to the edges — you want an even layer all the way out. Then generously cover the beef with all 6 oz of shredded cheddar.
Step 5: Top, Butter, and Bake
Place the top halves of the buns cut-side down over the filling. Brush the tops with the 2 Tbsp of melted butter — be generous and work quickly. Immediately sprinkle with sesame seeds before the butter sets.
Bake at 350 degrees F for 12–15 minutes, until the cheese is fully melted and the bun tops are a beautiful golden brown. Your kitchen is going to smell absolutely amazing right about now.
Expert Tips, Variations, and Troubleshooting
Tips for the Best Cheeseburger Sliders
Use lean ground beef (90/10 or 93/7) to avoid a greasy filling. Fattier beef releases too much liquid and can make the buns soggy — not what we’re going for here.
Press the beef layer all the way to the edges of the rolls. If there are gaps, the cheese slides around and you end up with uneven bites. Taking an extra 30 seconds to square it off makes a real difference.
Sprinkle the sesame seeds right after brushing with butter, while it’s still wet. If you wait even a minute, the seeds won’t stick and will roll right off when you slice them.
Fun Variations to Try
Swap the cheddar for pepper jack if you want a little heat. You can also mix in a spoonful of Worcestershire sauce or a dash of smoked paprika to deepen the beef flavor — both work beautifully.
Want to go fully loaded? Add a layer of dill pickle slices and a drizzle of mustard under the top buns before baking. It tastes like a classic diner burger in every tiny bite.
These also work great as make-ahead sliders. Assemble them fully, cover with plastic wrap, and refrigerate for up to 24 hours. Bake when ready — just add 3–5 extra minutes to the bake time since they’re going in cold.
Troubleshooting Common Issues
If your buns are browning too fast, tent the pan loosely with foil and continue baking until the cheese melts fully. Every oven is different, so check at the 12-minute mark.
Filling too wet? Make sure you’re draining the fat thoroughly before adding the mayo. Also, lean beef is really important here — anything above 80/20 will release too much fat during cooking.
Storage Instructions
| Method | Container | How Long |
|---|---|---|
| Refrigerator | Airtight container or wrapped in foil | Up to 3 days |
| Freezer (filling only) | Freezer-safe bag or container | Up to 2 months |
| Assembled (unbaked) | Covered baking sheet in fridge | Up to 24 hours |
Reheating Your Sliders
To reheat, wrap the sliders in foil and warm in a 325 degree F oven for about 10 minutes. This keeps the buns soft instead of drying them out. Avoid the microwave if you can — it makes the bread rubbery and sad.
For a crispy bottom, unwrap the foil for the last 2–3 minutes and let them sit directly on the oven rack. Totally worth that extra step.
No-Waste Kitchen Ideas
Leftover beef filling is gold. Stuff it into a baked potato, toss it over rice, or use it to fill make-ahead breakfast sandwiches the next morning. It reheats beautifully and tastes just as good day two.
Extra shredded cheddar? Sprinkle it into scrambled eggs or onto a bowl of soup. Nothing goes to waste in this kitchen.
Nutritional Information
| Nutrient | Per Slider (approx.) |
|---|---|
| Calories | ~220 kcal |
| Protein | ~13 g |
| Total Fat | ~11 g |
| Saturated Fat | ~5 g |
| Carbohydrates | ~17 g |
| Sodium | ~320 mg |
Nutrition values are estimates based on the listed ingredients and may vary depending on specific brands or substitutions used.
What to Serve with Cheeseburger Sliders for Dinner
These sliders are amazing alongside a creamy, classic Martha Stewart-style potato salad — that combo is summer cookout perfection any time of year.
If you’re going the party food dinner route, pair them with a fun charcuterie cup spread for an easy grazing table everyone will love. Add chips, pickles, and a simple coleslaw and you’re done.
For a lighter side, a crisp green salad or some roasted veggies balance out the richness of the sliders perfectly. And if someone at your table has dietary needs, check out this gluten-free pizza crust recipe for inspiration on adaptable baking swaps.
FAQs
Can I make cheeseburger sliders ahead of time?
Yes! Assemble the sliders completely, cover the baking sheet tightly with plastic wrap, and refrigerate up to 24 hours before baking. When you’re ready, just add 3–5 extra minutes to the bake time. This makes them one of the most stress-free easy dinner ideas around.
What’s the best cheese for cheeseburger sliders?
Medium cheddar is the classic go-to here — it melts well and has enough sharpness to hold its own against the seasoned beef. Pepper jack, American, or smoked gouda are great swaps if you want to mix things up.
Can I use a different type of roll?
Absolutely. Hawaiian rolls add a slightly sweet flavor that pairs really well with the savory beef. Brioche slider buns work beautifully too. Just make sure you’re using rolls that are similar in size so everything bakes evenly.
How do I keep the buns from getting soggy?
The sliced cheese layer on the bottom of the buns acts as a barrier between the bread and the beef filling — don’t skip it. Using lean ground beef and draining the fat well before adding mayo also helps a lot.
Are these good for a party?
These are absolutely perfect as party food for dinner. The batch makes 24 sliders, they travel well in the pan, and they can be fully assembled before your guests arrive. Just bake them fresh and serve straight from the tray for the best results.
Let’s Make It Tonight
There you have it — the ultimate cheeseburger sliders for dinner that work for a lazy weeknight, a lively party, or honestly just because you deserve something delicious. They’re easy, cheesy, and guaranteed to disappear fast.
If you love recipes that are simple but seriously satisfying, you’ll also want to check out this sweet cinnamon zucchini bread for a cozy baking project to follow up dinner.
Made these sliders? I’d love to hear how they turned out! Drop a comment below with your favorite variation, and if you loved them, please share this recipe on Pinterest so more people can discover their new favorite easy dinner idea.
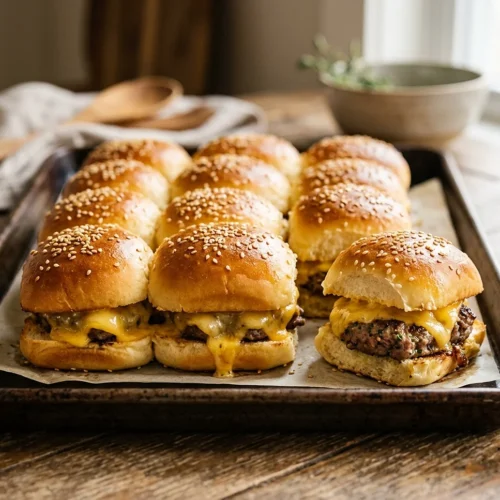
Cheeseburger Sliders for Dinner
Equipment
- Rimmed Baking Sheet
- Large skillet
- Spatula
- Pastry brush
- Sharp knife
Ingredients
Beef & Seasoning
- 2 lb lean ground beef 90/10 or 93/7 fat content
- ½ tbsp olive oil
- 1 tsp salt
- 1 tsp black pepper
- 1 tsp garlic powder
- ½ large yellow onion finely diced
- ¼ cup mayonnaise
Cheese
- 8 slices medium cheddar cheese sliced
- 6 oz medium cheddar cheese shredded; or use more sliced cheese
Buns & Topping
- 24 dinner rolls or 2 packs of 12
- 2 tbsp unsalted butter melted, plus more to grease baking sheet
- 1 tbsp sesame seeds
Instructions
- Preheat oven to 350°F. Butter the bottom of a rimmed baking sheet generously to prevent sticking and help the buns develop a golden, slightly crisp bottom.
- Place a large skillet over medium-high heat with 1/2 Tbsp olive oil. Add the finely diced onion and cook for about 1 minute until softened. Add 2 lbs ground beef and break it up with a spatula. Season with 1 tsp salt, 1 tsp black pepper, and 1 tsp garlic powder. Cook over medium-high heat, breaking up the beef, just until cooked through. Remove from heat — do not overcook.
- Tilt the skillet and spoon off any excess fat, discarding it. Stir 1/4 cup mayonnaise into the warm ground beef mixture until fully combined. The mayo keeps the filling moist and creamy inside the bun.
- Cut all dinner rolls in half. Place the bottom halves on the buttered baking sheet and line them with the sliced cheddar cheese, covering edge to edge to create a moisture barrier. Spread the ground beef mixture evenly over the sliced cheese, using the back of a spatula to square off the edges. Cover the beef layer with all 6 oz of shredded cheddar.
- Place the top bun halves cut-side down over the filling. Brush the tops with 2 Tbsp melted butter, then immediately sprinkle with sesame seeds while the butter is still wet so they adhere. Bake at 350°F for 12–15 minutes, or until the cheese is fully melted and the tops are golden brown.